How to Prepare for a Ballet Photoshoot (and Actually Love Your Photos)
- 2 days ago
- 8 min read
If the idea of a professional dance photoshoot fills you with equal parts excitement and dread, you are not alone. Most adult dancers have a running list of worries going in: Will I look stiff? What do I even wear? Are my extensions good enough for photos?
The good news is that a great dance photoshoot has very little to do with how advanced you are, and a whole lot to do with how prepared and collaborative you're willing to be. In episode 112 of After Class: The Adult Ballet Podcast, I chatted with professional dance photographer Katie Ging about the process from beginning to end. Here's what every adult dancer should know before stepping in front of the lens. 📸
Choosing a Photographer
Not all photographers are created equal when it comes to dance photoshoots. A photographer who has experience working with ballet dancers will be able to give you posing guidance that makes you look your best while also reading "dancer" in the finished image. For example, a non-dance photographer will not understand the concept of turnout, so they wont think to remind you to "turn out your back foot a bit" to get the best possible final image. Especially when taking photos en pointe, contracting a photographer who understands (and can identify) things like "sickling" and "getting over the box" will ensure the best possible results. 🩰
That said, a great non-dance photographer can still give you great results. But if you do go that route, just come in a little more prepared. Know what poses you want to try, be ready to get into them (practice beforehand) and stay open to their creative interpretation. Sometimes the photos you least expected to like will end up being your favorites!
What to Wear
The assumption tends to be: leotard, tights, bun. Done. But a dance photoshoot is actually an opportunity to express yourself way beyond the studio "uniform."

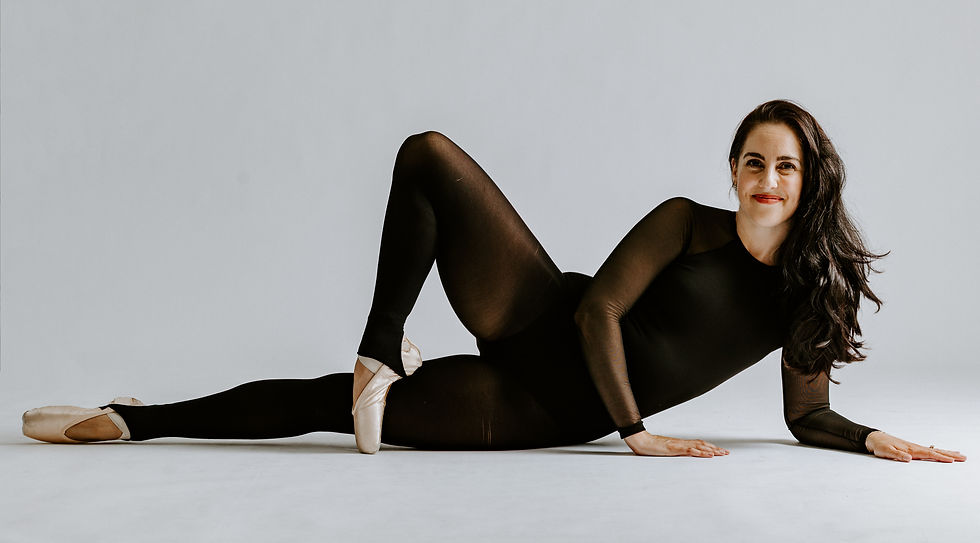
On footwear: Pointe shoes, ballet flats, and bare feet all have their place. If you're relatively new to pointe work, you can absolutely still wear pointe shoes. There are plenty of beautiful, simple poses that don't even require you to be up en pointe! Even just sitting on the floor with your feet crossed in pointe shoes makes for a lovely photo (see right). If you have time, try to bring two options. Different footwear creates different looks, and options are always a good thing.
On clothing: Don't feel limited to dance attire. A flowy dress, a vintage piece, or even a fun oversized sweater can look great and let your personality shine through. The photo shoots where you bring a little piece of yourself (a sentimental prop, a special outfit, something that feels like you) tend to produce the photos you'll love most. Likewise, don't assume it has to be a full-body shot. Closeup photos of your feet in pointe shoes, your arms in an elegant line, or your legs in legwarmers can be just as artistically stunning as a full-length pose. (And something you might feel more inclined to display in your home as a piece of art.)
If you're shooting outdoors, flowy fabrics (rehearsal length skirts, chiffon layers, or soft dresses) tend to catch the light and create a sense of movement. Think about the setting when you plan your outfit, and if you're unsure, bring options!
On hair: Having your hair down tends to photograph beautifully and feel more relaxed and personal. While a bun or French twist gives classic "ballerina" vibes. Luckily it's pretty easy to do both, even with time contraints, if you start with your hair up then pull it down mid-shoot. I did this at my last photoshoot and was so glad I did — my hair-down photos were my favorite! (See left.)
The best photos are the ones where you look & feel most like yourself. Let your individuality shine through!
How to Prepare Before the Shoot
A little prep goes a long way, but there's a sweet spot. You want to come in with a few ideas and some physical readiness, without being so attached to a specific outcome that you can't be flexible. Some tips for preparation...
Create a mood board or photo folder. Scroll through Instagram or Pinterest and screenshot poses, outfits, and vibes that resonate with you. (Some photographers will ask you to send these ahead of time so they can plan the flow of the shoot around your goals.) Once you have your images, try the poses at home in front of a mirror. This weeds out anything that just isn't going to work for your body or skill level. Not every pose that looks incredible on a professional dancer will translate for the rest of us, and it's nice to figure that out before the shoot.
Know your strengths. Are you someone with beautiful port de bras and épaulement ? Lean into that. Are you a jumper? Plan to do some sautes! Going in with a clear sense of what you want to highlight vs trying to do everything, means you'll come away with photos that actually feel like you rather than a random sampler of ballet poses.
Warm up. Show up ready to move. If you plan to do anything en pointe, give yourself time to warm up in your shoes. If you're hoping to get jump shots, warm up even more thoroughly for those, and plan to save them for later in the session.
Do a few push-ups or ab exercises. This tip comes courtesy of Katie Ging 😁 A little muscle activation before your shoot helps your lines show up more clearly on camera. Fashion models use this trick all the time.
Don't arrive too early. It sounds counterintuitive, but arriving with too much time to spare can work against you. The extra wait gives your nerves more time to spiral. Aim to arrive with enough time to change, warm up, and settle in — but not so much that you spend 20 minutes overthinking everything.
Posing: What Works and What Doesn't
The arabesque problem. Arabesque is the pose everyone wants to do, and it's also one of the hardest to get a good photo of. The technical demands are so high that your face tends to look strained, and it almost never looks as good in a photo as it does in your head. If your really what an arabesque photo though, try lowering it to around 45 degrees. It's more photogenic than straining for a higher line, and gives off romantic era vibes, a la Giselle. But in general, if you're hoping to walk away with photos you love, the arabesque is not your safest bet.
Consider your angles. This applies especially to jumps and extensions: poses where your legs are going straight toward the camera tend to lose their impact because your lines are compressed. Turning slightly to the side and shooting in profile is almost always more flattering and shows off the lines of your body much more clearly.
Watch your shoulders. When we're nervous or concentrating hard, our shoulders tend to creep up. It happens to everyone! Make a conscious effort to drop and relax them. Tense, raised shoulders are one of the most common things that make an otherwise great photo look stiff.
Avoid facing the camera straight on. Standing square to the camera tends to be less flattering for most body types. Instead, shift your hips slightly to one side and angle your shoulders in the opposite direction. Engage your core and lengthen through your spine. This creates a natural, elegant shape that photographs much better than a front-facing stance.

Poses that almost always work:
Sitting or on the ground with your feet crossed, in pointe shoes. Clean, elegant, and universally flattering (see earlier photo for reference)
Fourth position with hands clasped behind the back. Simple, timeless, and surprisingly striking. Think of Degas's Little Dancer Aged Fourteen arguably the most famous ballet sculpture in the world. She's not mid-leap or in a dramatic arabesque, she's just standing in fourth position, hands behind her back, and she's iconic. Katie took a photo of me in a variation of this pose and it's one of my favorites! (See right).
On extensions: Your extensions do not need to be high to be beautiful. A 45-degree extension with a fully pointed, turned-out foot translates as much more relaxed and graceful in photos than a forced higher leg. Extensions that are close to the ground give you more control over your turnout and your foot, and they have a timeless, classical quality.
Don't let flexibility (or lack thereof) be the reason you hold back from getting your photos taken!
On jumps: If you're shooting in a studio setting with a backdrop, think vertical rather than horizontal. Studio spaces are often small, and a traveling jump like a grand jeté needs room. A simple soubresaut or saute in second position keeps things compact and still looks great. Save the bigger traveling jumps for shoots on stage, in a ballet studio or on location (just beware of hard or uneven surfaces "in the wild"). If you're going to do jumps, save them for the end of the session when you're nice & warm!
Leave room to improvise. Some of the best photos come from in-between moments, when you're transitioning between poses, adjusting your hair, or just moving naturally. Don't be so locked into your pose list that you miss those. Let yourself move.
Facial Expressions
The more difficult the pose, the harder it becomes to think about your face, which is part of why simpler poses often yield the most beautiful photos. Here are a few tips that make a real difference, courtesy of Katie Ging.
Find your eyeline. A useful trick: look over your middle finger. It sounds random, but it naturally lifts your chin and keeps your gaze soft and directed rather than blank.
Relax your mouth. When we're concentrating, we tend to purse our lips. A small amount of openness and a slight exhalation reads as relaxed and natural in photos.
Let your personality show. If you're a smiley person, smile. If you're more contemplative, let that come through. A soft smile, smiling with your eyes (or "smizing" if you watched America's Next Top Model in the early 2000's 😂) photographs well too. At the end of the day, the photos you'll love most are the ones where you look at them and think "That feels like me."
Think About Location
If you're booking your own shoot (rather than attending a retreat/intensive where a shoot is included), location matters more than you might think. Studio backdrops give you clean, classic images where the focus stays on you. Outdoor or on-location shoots open up more creative possibilities and tend to have a more editorial feel, with natural light and interesting backgrounds adding to the story. Stages are wonderful for jumps and bigger movements since you'll have the space to actually travel.
There's no wrong answer, it just comes down to the kind of images you want to end up with. If your unsure, notice what kind of shots you gravitate to most when scrolling on Instagram or Pinterest. You might notice a recurring theme, like urban environments, natural, green settings, or shots with a simple, solid backdrop.
It's Worth It, Even If It Feels Scary
At any given retreat or intensive, there are dancers who would rather skip the photoshoot entirely. If that's you, I want you to promise me you'll give it a try anyway. Tell your photographer that you're nervous (don't be afraid to name specific insecurities like, "I can't lift my leg very high" or "I just started pointe, so I can't do much off the barre." Ask for privacy if that helps. Ask to play music! Do whatever you need to feel relaxed and at-ease.
I truly believe that if you're a passionate adult dancer, your ballet photos are some of the most meaningful photos you'll ever take. They truly capture the journey — not just how you look, but how far you've come, and what ballet means to you. Don't let insecurity talk you out of having that for yourself.
Listen to Episode 112
Katie goes even deeper in the full conversation — including specific poses she loves to use, how to work with a non-dance photographer, and her best tips for first-timers who are nervous going in. Listen to episode 112 below or wherever you get your podcasts!
Connect with Katie Ging
🌐 Website: katiegingphotography.com
📸 Instagram: @katiegingphotography
Wishing you an unforgettable photoshoot!
xx, Hannah


Comments